大家好我们这一节讲的是LayoutInflater的使用,在实际开发种LayoutInflater这个类还是非常有用的,它的作用类似于findViewById(),
不同点是LayoutInflater是用来找layout下xml布局文件,并且实例化!而findViewById()是找具体xml下的具体widget控件(如:Button,TextView等)。
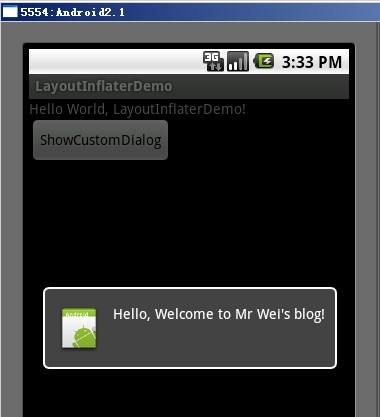
为了让大家容易理解我做了一个简单的Demo,主布局main.xml里有一个TextView和一个Button,当点击Button,出现Dialog,而这个Dialog的布局方式是我们在layout目录下定义的custom_dialog.xml文件(里面左右分布,左边ImageView,右边TextView)。
效果图如下:
下面我将详细的说明Demo的实现过程:
1、新建一个Android工程,我们命名为LayoutInflaterDemo.
2、修改main.xml布局,里面主要在原来基础上增加了一个Button.代码如下:
- <?xmlversion="1.0"
- encoding="utf-8"?>
- <LinearLayout
- xmlns:android="http://schemas.android.com/apk/res/android"
- android:orientation="vertical"
- android:layout_width="fill_parent"
- android:layout_height="fill_parent"
- >
- <TextView
- android:layout_width="fill_parent"
- android:layout_height="wrap_content"
- android:text="@string/hello"
- />
- <Button
- android:id="@+id/button"
- android:layout_width="wrap_content"
- android:layout_height="wrap_content"
- android:text="ShowCustomDialog"
- />
- </LinearLayout>
3.定义对话框的布局方式,我们在layout目录下,新建一个名为custom_dialog.xml文件具体代码如下:
- <?xmlversion="1.0"
- encoding="utf-8"?>
- <LinearLayout
- xmlns:android="http://schemas.android.com/apk/res/android"
- android:orientation="horizontal"
- android:layout_width="fill_parent"
- android:layout_height="fill_parent"
- android:padding="10dp"
- >
- <ImageViewandroid:id="@+id/image"
- android:layout_width="wrap_content"
- android:layout_height="fill_parent"
- android:layout_marginRight="10dp"
- />
- <TextViewandroid:id="@+id/text"
- android:layout_width="wrap_content"
- android:layout_height="fill_parent"
- android:textColor="#FFF"
- />
- </LinearLayout>
4.修改主程序LayouInflaterDemo.java代码如下:
- packagecom.android.tutor;
- importandroid.app.Activity;
- importandroid.app.AlertDialog;
- importandroid.content.Context;
- importandroid.os.Bundle;
- importandroid.view.LayoutInflater;
- importandroid.view.View;
- importandroid.view.View.OnClickListener;
- importandroid.widget.Button;
- importandroid.widget.ImageView;
- importandroid.widget.TextView;
- publicclassLayoutInflaterDemoextendsActivityimplements
- OnClickListener{
- privateButtonbutton;
- publicvoidonCreate(BundlesavedInstanceState){
- super.onCreate(savedInstanceState);
- setContentView(R.layout.main);
- button=(Button)findViewById(R.id.button);
- button.setOnClickListener(this);
- }
- @Override
- publicvoidonClick(Viewv){
- showCustomDialog();
- }
- publicvoidshowCustomDialog()
- {
- AlertDialog.Builderbuilder;
- AlertDialogalertDialog;
- ContextmContext=LayoutInflaterDemo.this;
- LayoutInflaterinflater=(LayoutInflater)
- mContext.getSystemService(LAYOUT_INFLATER_SERVICE);
- Viewlayout=inflater.inflate(R.layout.custom_dialog,null);
- TextViewtext=(TextView)layout.findViewById(R.id.text);
- text.setText("Hello,WelcometoMrWei'sblog!");
- ImageViewimage=(ImageView)layout.findViewById(R.id.image);
- image.setImageResource(R.drawable.icon);
- builder=newAlertDialog.Builder(mContext);
- builder.setView(layout);
- alertDialog=builder.create();
- alertDialog.show();
- }
- }
5、最后执行之,点击Button,将得到上述效果。
好今天就到此为止,睡觉了,大家有什么不明白的请留言~谢谢!
转自:http://blog.csdn.net/android_tutor/article/details/5513869
大家好我们这一节讲的是LayoutInflater的使用,在实际开发种LayoutInflater这个类还是非常有用的,它的作用类似于findViewById(),
不同点是LayoutInflater是用来找layout下xml布局文件,并且实例化!而findViewById()是找具体xml下的具体widget控件(如:Button,TextView等)。
为了让大家容易理解我做了一个简单的Demo,主布局main.xml里有一个TextView和一个Button,当点击Button,出现Dialog,而这个Dialog的布局方式是我们在layout目录下定义的custom_dialog.xml文件(里面左右分布,左边ImageView,右边TextView)。
效果图如下:
下面我将详细的说明Demo的实现过程:
1、新建一个Android工程,我们命名为LayoutInflaterDemo.
2、修改main.xml布局,里面主要在原来基础上增加了一个Button.代码如下:
- <?xmlversion="1.0"
- encoding="utf-8"?>
- <LinearLayout
- xmlns:android="http://schemas.android.com/apk/res/android"
- android:orientation="vertical"
- android:layout_width="fill_parent"
- android:layout_height="fill_parent"
- >
- <TextView
- android:layout_width="fill_parent"
- android:layout_height="wrap_content"
- android:text="@string/hello"
- />
- <Button
- android:id="@+id/button"
- android:layout_width="wrap_content"
- android:layout_height="wrap_content"
- android:text="ShowCustomDialog"
- />
- </LinearLayout>
3.定义对话框的布局方式,我们在layout目录下,新建一个名为custom_dialog.xml文件具体代码如下:
- <?xmlversion="1.0"
- encoding="utf-8"?>
- <LinearLayout
- xmlns:android="http://schemas.android.com/apk/res/android"
- android:orientation="horizontal"
- android:layout_width="fill_parent"
- android:layout_height="fill_parent"
- android:padding="10dp"
- >
- <ImageViewandroid:id="@+id/image"
- android:layout_width="wrap_content"
- android:layout_height="fill_parent"
- android:layout_marginRight="10dp"
- />
- <TextViewandroid:id="@+id/text"
- android:layout_width="wrap_content"
- android:layout_height="fill_parent"
- android:textColor="#FFF"
- />
- </LinearLayout>
4.修改主程序LayouInflaterDemo.java代码如下:
- packagecom.android.tutor;
- importandroid.app.Activity;
- importandroid.app.AlertDialog;
- importandroid.content.Context;
- importandroid.os.Bundle;
- importandroid.view.LayoutInflater;
- importandroid.view.View;
- importandroid.view.View.OnClickListener;
- importandroid.widget.Button;
- importandroid.widget.ImageView;
- importandroid.widget.TextView;
- publicclassLayoutInflaterDemoextendsActivityimplements
- OnClickListener{
- privateButtonbutton;
- publicvoidonCreate(BundlesavedInstanceState){
- super.onCreate(savedInstanceState);
- setContentView(R.layout.main);
- button=(Button)findViewById(R.id.button);
- button.setOnClickListener(this);
- }
- @Override
- publicvoidonClick(Viewv){
- showCustomDialog();
- }
- publicvoidshowCustomDialog()
- {
- AlertDialog.Builderbuilder;
- AlertDialogalertDialog;
- ContextmContext=LayoutInflaterDemo.this;
- LayoutInflaterinflater=(LayoutInflater)
- mContext.getSystemService(LAYOUT_INFLATER_SERVICE);
- Viewlayout=inflater.inflate(R.layout.custom_dialog,null);
- TextViewtext=(TextView)layout.findViewById(R.id.text);
- text.setText("Hello,WelcometoMrWei'sblog!");
- ImageViewimage=(ImageView)layout.findViewById(R.id.image);
- image.setImageResource(R.drawable.icon);
- builder=newAlertDialog.Builder(mContext);
- builder.setView(layout);
- alertDialog=builder.create();
- alertDialog.show();
- }
- }
5、最后执行之,点击Button,将得到上述效果。
好今天就到此为止,睡觉了,大家有什么不明白的请留言~谢谢!
转自:http://blog.csdn.net/android_tutor/article/details/5513869
分享到:


相关推荐
Android高手进阶教程之----Android中万能的BaseAdapter(Spinner,ListView,GridView)的使用!.doc Android高手进阶教程之----通过Location获取Address的使用.doc Android基础教程之----Android ProgressBar的使用.doc...
Android 中LayoutInflater的使用
主要介绍了Android LayoutInflater分析的相关资料,需要的朋友可以参考下
LayoutInflater Layout 与 Inflater[扩充]两个单词的合并,可以理解为:当前Activity 布局的扩充.
android中LayoutInflater的使用.pdf
down-test-Android 获得 LayoutInflater 实例的三种方式
NULL 博文链接:https://yufeng-zhu.iteye.com/blog/1676207
测试:Android 中LayoutInflater的使用 注意:Aj_04是用了调用另外一个界面,要注意调用的方法, 还一定还要在AndroidManifest.xml 中加上呢句:<activity android:name="LayoutInflaterDemo"></activity>
Android 中LayoutInflater(布局加载器)之实战篇 博客的Demo 博客地址: http://blog.csdn.net/l540675759/article/details/78112989 两种方式实现小红书的引导页: (1)自定义View (2)自定义LayoutInflater....
JavaScript应用实例-LayoutInflater.js
LayoutInflater类在我们日常开发中经常会用到,最近在使用中就遇到了一些问题,所有下面这篇文章主要给大家总结了关于Android中使用LayoutInflater要注意的一些坑,希望通过这篇能让大家避免走一些弯路,需要的朋友...
在android中,LayoutInflater有点类似于Activity的findViewById(id),不同的是LayoutInflater是用来找layout下的xml布局文件,并且实例化!而findViewById()是找具体xml下的具体 widget控件(如:Button,TextView等)。...
通过LayoutInflater.Factory实现主题切换功能,详见:http://blog.csdn.net/llew2011
android inflate demo,方便新手使用,下载导入android studio就可直接运行,简单明了的展现inflate不同参数的区别
NULL 博文链接:https://lxmgfd.iteye.com/blog/979716
关于Android的LayoutInflater的使用!
对于有一定Android开发经验的同学来说,一定使用过LayoutInflater.inflater()来加载布局文件,但并不一定去深究过它的原理,比如 1.LayoutInflater为什么可以加载layout文件? 2.加载layout文件之后,又是怎么变成供...
import android.view.LayoutInflater; import android.view.View; import android.widget.ImageView; import android.widget.TextView; import android.widget.Toast; public class MyToast { public static void ...